11 exercises and techniques to start drawing from scratch


At the core of a good illustrator’s craft are two fundamentals: the ability to control your hand and proper seeing. If you want to create beautiful illustrations or website designs, special training is essential. Still, you can learn some basics. That’s what this article is about.
Tip: use one type of pen and one type of paper (for example, A5).
🤙 Hand agility training
The first two techniques are about controlling your hand. You should build muscle memory and learn to coordinate sharp eyesight with wrist movement. Mechanical practices are excellent for beginners. Later, you can reuse them to test new tools. They also help you relax and take a break from mental or physical work. So, here’s how to start drawing correctly.
🟡 1. Lots of circles
Fill a sheet of paper with circles of different sizes. Try not to let the circles intersect.
Learning to draw circles is not as simple as you might think. Notice: the more circles there are on the paper, the harder it becomes to add the next one. Draw them in both directions and as many as you can.
Tip. Shake your wrist when it starts to cramp; do this after each set.
🏐 2. Hatching — creating structure
Fill a sheet of paper with parallel lines.

Diagonal lines are the easiest because they follow the movement of our wrist. Have you noticed that left-handers prefer the opposite direction from right-handers? Look at the drawings of your favorite artist and guess which hand they used!
Now be sure to try other directions too. Have fun! Combine different hatchings and enjoy.
Tip. Do not rotate the paper. It’s important to train your hand in different directions.
So, after training the hand, we need exercises for the eyes!
Perception — learning to see
Drawing is primarily about vision and understanding what you see. People often assume everyone sees the same thing, but that’s not true. You can always improve and develop the quality of your sight. The more you draw, the more you see. The following four techniques will expand your view of familiar objects. This is exactly where drawing courses usually start.
🗺️ 3. Contour — Show me your hands!
Do you see the intriguing, varied contours of your hand? Draw them on paper. Don’t try to capture everything; pick just a few of the most interesting ones.
Whether you draw a person, a plant, or your favorite animal — you create the contour of what you see. Contours define the body or object and make the drawing recognizable. The goal is not to show every distinctive feature immediately, but to learn to see them!
Even if you already know the form of the object, it’s still worth taking a closer, fresh look.
⛰️ 4. Light and shadow — folding light and dark
Lay down and draw a piece of fabric. Start with contours and then, using your hatching skills, create the play of light and shadow.
This exercise helps you learn to render light and shadow on paper. I must admit, it’s not the easiest for beginners. Keep in mind that perfectly smooth shading transitions aren’t required. Fabric is a playground to practice the skills from the previous lessons. Plus, you’ll understand how to draw light and shadow using just your hand.
Tip. Use curved hatching to create form and cross-hatching for deeper shadows that resemble the texture of fabric.
🧱 5. Perspective — cubes in three-dimensional space
Let’s draw cubes! Just follow the simple steps below.
Perspective drawing is the projection of a 3D object into 2D space (your sheet of paper).
Let’s break down how to draw this perspective step by step:
Step 1. Draw a horizontal line. This will be the horizon.

Step 2. Place two points at the ends of the line — two invisible vanishing points.

Step 3. Draw a vertical line anywhere.

Step 4. Connect the ends of the vertical line to the vanishing points.
Step 5. Add two more vertical lines as shown below.
Step 6. Connect them to the vanishing points.
Step 7. Now use a black pencil or pen to outline the cube.
Repeat steps 3 through 7 as many times as you like. Enjoy the construction! Get pleasure from drawing — that’s how you’ll succeed. You can hatch the cube’s faces.
Tip. When drawing cross lines, slightly overlap one line over the other; the form becomes clearer.
Mastering perspective drawings will let you create the illusion of depth. But most importantly, you train your brain to think in three dimensions. So even if you decide to draw “flat” images or to play with the “rules” of perspective, this skill pays off.
🔅 6. Composition — Why is this here?
Make 5 different drawings of an object. Place the object on the paper differently each time:

Composition is a great tool to “say” something with a drawing, to give it meaning or a message.
To understand how it works, remember that our perception is shaped by everyday experience. For example, horizontal and vertical lines seem more “stable” to us than diagonals, which feel like they could “fall” any second. And when we see a large dark shape at the bottom, we somehow assume it must be “heavy.”
As you create different arrangements of your subject on the page, try to track how these choices change its connotation — its meaning.
Now let’s move on to more advanced things 😀
💢 7. Negative space — look at what is NOT there
Draw the gaps between objects

See the “hole” in the mug’s handle? Those strange shapes between fingers? Look around and find the empty spaces between things. Simply collect and place them anywhere on the paper.

We tend to see and draw what we already know. Here’s a car, here’s a house, that’s my cat, etc. Our attempts to recognize things make us blind to their shapes. When we focus on what lies between objects, we trick our perception into truly seeing the objects’ forms.
Tip: Pay attention to the spaces between letters to see the characteristics of a typeface!
🔃 8. Dynamic drawing
Draw the dynamics of something static
In this exercise we capture the motion of things through quick lines.
When you draw people — even when they’re still — it’s especially important to give the viewer a sense of motion.
Tip: make dynamic drawings quickly, but not sloppily.
Note. Some call such drawings “gesture drawings.” I prefer “dynamic,” because it’s about the subject’s dynamics.
🤸♂️ 9. Foreshortening — looking in perspective
Find a box-shaped object, observe its receding lines, and then draw it!

In item #5 we drew a cube. The horizon defined our eye level. The vanishing points helped us draw the correct angles.

This time we do the opposite: we discover the diagonal lines in boxy objects. Find such an object and pay attention to the shape of the rectangle in perspective.
Now draw the wireframe of your object! You don’t need to define the horizon or vanishing points. Roughly guess where they are and converge the lines accordingly. Find more box-like objects of different sizes and make lots of such drawings!
✒️ 10. Proportion
Draw a window and what you see outside
The term “proportion” describes the ratio of sizes. Before we pick up our pens, it’s useful to understand why it’s so hard to compare the sizes of objects at different distances.
Things that are far away appear smaller. We learn to account for distance when comparing sizes.
In the image on the left we see what things look like; on the right, what we know about them.
There’s a difference between the sizes we actually see and the sizes we know. “Optical illusions” like the one below demonstrate the power of our perception. Our brain takes cues from just a couple of diagonal lines, builds a virtual space, and “computes” that in this space the person on the right must be taller:
This compensation mechanism is very useful in everyday life. But it makes it harder to assess and compare the sizes we need in our drawings. To get the right size “on paper,” we must ignore the size we know and draw the size we see. We know the person farther away isn’t smaller, but we need to draw them smaller on the paper.
There are tricks to overcome distractions and “see flat.” One is to keep your arm at a fixed distance from your eye and measure the “flat” size with a pen.
Another is to “frame” what we see. This helps us view the flat rectangular picture we’re about to draw, estimate sizes “on paper”, and compare them correctly.
I suggest you look at the world through a window. The window frame serves as a reference to understand, for example, where the tree stands in the picture or how tall that house is.
🧊 11. Depth
Let’s draw a plant

We need to focus our attention and resist clichéd symbolic expressions.
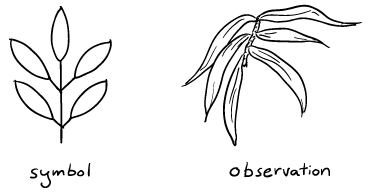
Of course, nature’s complexity can be overwhelming. I suggest you choose just a small detail of the plant, start with one leaf, and go from there. Move from one leaf to another. And when you draw a leaf or stem, be sure to consider the entire form, even the parts in shadow. Overlaps will create a pleasant sense of depth.

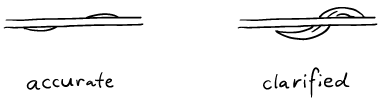
While we want to draw as accurately as possible, let’s remember that every drawing is an abstraction. And just like a good story, it should be believable, not always exact. So when shapes ambiguously overlap, it’s often helpful to clarify that ambiguity for the viewer.
This ability to work with detail can be one of the biggest advantages drawings have over photographs.